Making a Cheapo RGB LED Light a Smart Bulb with a Raspberry Pi Zero W
I was recently gifted a Google Home mini and placed it on my bedside table. Being able to turn off music with my voice while I was in bed and too lazy to move my hand half a metre to my phone has frankly been the best part. I quickly wished I could do the same for turning off my bedside lamp. I already had a cheap LED RGB light bulb that’s controlled by an infrared remote. I considered replacing it with a Philips Hue or LIFX bulb but they cost $60+, so bugger that. So instead I used a raspberry pi zero W to listen for commands from the google assistant and control the lamp with an IR LED connected through the GPIO pins. I doubt many will want to replicate this setup exactly but I’ve written instructions for every step in case it helps anyone attempting anything similar. I’m a hardware guy, not a web developer guy, so it took me a while to work out how to get a signal from google to my raspberry pi to send IR commands. I ended up needing to use a long chain of services and software. So when you say “Hey Google, turn on the light” what happens is this:
- Google triggers an IFTTT applet that I’ve configured to listen for that phrase
- IFTTT makes a POST web request to a raspberry pi next to my lamp
- The request makes a Node.Js app running on the Pi run a python script
- The python script runs a bash command
- The bash command is for lirc which sends the IR signal to a IR LED connected through the Pi’s GPIO pins.
- The LED flashes the command and the LED bulb does what I asked.
All of this is much more complicated than I would like, but the only other way I’ve seen this done is by sending emails to the Pi, which just seems ludicrous to me. Most of this is adapted from Kyle Peacock’s tutorial on instructables.com. Props to him for doing 99% of the work.
Hardware Used#
- Raspberry Pi Zero W
- Generic LED bulb/LED strip that’s controlled with an infrared remote
- IR photodiode
- IR receiver
- Almost any transistor if you’re making the IR circuit yourself
- Breadboard, jumper cables, and a few resistors
Hardware Setup#
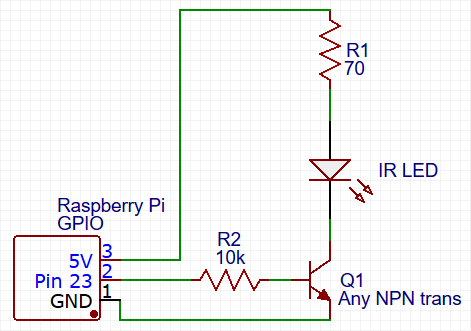
We need to attach an IR sender and receiver to the Pi’s GPIO pins. For the sender I ripped a diode out of an old robot I made years ago that never did quite work that well. Chucked it on a breadboard with a bare-bones transistor circuit:
I’m bad at making these
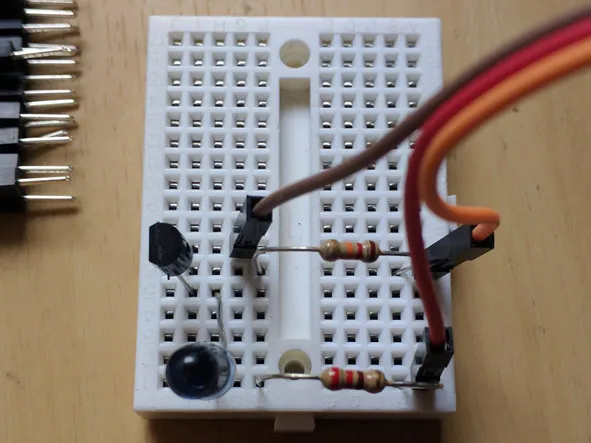
My breadboard
Keen eyes might notice my resistor values are quite off. Took me a while to realise the LED’s resistor was much too high and that’s why the LED seemed to be so dim. For the IR receiver I had an Arduino module laying around so I just connected that up. I’m sure IR transmitter modules also exist and are very cheap. It’s only needed for the setup to learn the particular commands for your device. I connected the transmitter to GPIO pin 23 and the receiver to GPIO pin 24. Be careful since the GPIO pin numbers don’t match the physical order. Here’s a nice guide by softwaresamurai.org
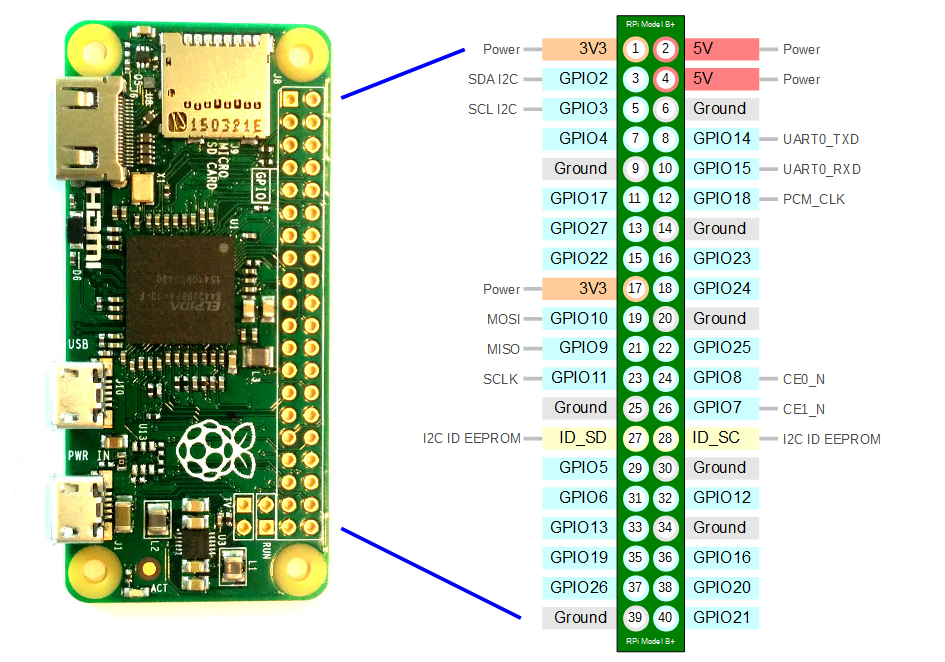
Your Pi may differ
For power I simply used the two 5V power pins and ground pins. I had to solder a header to the Pi Zero to connect everything with breadboard jumper cables.
Setup the Raspberry Pi Software#
I’ll walk through the entire process. Download latest Raspbian from https://www.raspberrypi.org/downloads/raspbian/ Install the non-desktop, lite version since we won’t need a GUI. I use etcher to copy to a SD card on my windows machine because it has a pretty UI. Etcher will unmount the card so reinsert it to your PC because we need to edit some files before booting the Pi. In the boot partition, create a file called ‘wpa_supplicant.conf’ and paste into it the following:
ctrl_interface=DIR=/var/run/wpa_supplicant GROUP=netdev
update_config=1

network={
ssid="YOURSSID"
psk="YOURPASSWORD"
scan_ssid=1
}
Making sure to enter your own WiFi’s SSID and password. Also create a file just called ‘ssh’ to enable the SSH server. Plug in the SD to your pi, connect the power and wait a few moments for it to boot up. Hopefully it will connect to your WiFi and be ready to login. On your desktop login to the pi over SSH (I use ‘BASH for windows’ for stuff like this, there are other apps and methods I’m sure):
ssh pi@raspberrypi.local
I had to look up the IP on my router, I’m inpatient and the hostname was taking too long for my router to sort out. Login with the password ‘raspberry’. Use passwd to change the password as soon as you login though. grab all the latest updates:
sudo apt update
sudo apt full-upgrade
Set up lirc (The IR software)#
We’re gonna use lirc to control the IR transmitter. It’s surprising complicated to setup and there’s conflicting guides out there for using it on a raspberry, so here’s what I did, mainly following this guide:
sudo apt install lirc
We’re only getting started. Now the fun begins.
sudo nano /etc/modules
add the following lines to the file:
lirc_dev
lirc_rpi gpio_in_pin=24 gpio_out_pin=23
Double check that the in and out GPIO pin numbers are correct. Control-X to exit nano, type ‘y’ to save then enter to confirm the filename. Then onto the next file:
sudo nano /etc/lirc/hardware.conf
add the following lines:
LIRCD_ARGS="--uinput --listen"
LOAD_MODULES=true
DRIVER="default"
DEVICE="/dev/lirc0"
MODULES="lirc_rpi"
Save and exit, then move onto the next config file:
sudo nano /boot/config.txt
Near the bottom uncomment ‘dtoverlay=lirc-rpi’, adding the gpio pins
dtoverlay=lirc-rpi,gpio_in_pin=24,gpio_out_pin=23
now one more file to edit:
sudo nano /etc/lirc/lirc_options.conf
Find the driver and device lines near the top and change to:
driver = default
device = /dev/lirc0
Now do a full reboot, restarting the service is not enough.
sudo reboot
Wait for the Pi to restart then log back in. Now to test lirc is working, we first have to stop the service for some reason, then run mode2:
sudo /etc/init.d/lircd stop
mode2 -d /dev/lirc0
Pressing a key on the lamp’s remote gives a whole ton of output about the timings of the signal, so we know lirc can at least receive signals now. We are going to use irrecord to create a config for our off-brand lamp’s remote. Once again the service must be stopped for this program to work.
sudo /etc/init.d/lircd stop
sudo irrecord -d /dev/lirc0 ~/lircd.conf
irrecord will make you press random keys for 5 minutes as it tries to work out what language the IR remote is talking. Once it is happy it will prompt you to start entering button names and then press the corresponding button on the remote. By default you are limited to lirc’s standard list of button names, even though you type in the name. I didn’t want to restart irrecord with custom names enabled and spend another 5 minutes pressing buttons, so I picked names from the default list. Hence my button names are a bit weird and all caps:
ON = KEY_WAKEUP
OFF = KEY_SLEEP
RED = KEY_RED
GREEN = KEY_GREEN
BLUE = KEY_BLUE
WHITE = KEY_W
Brightness up = KEY_BRIGHTNESSUP
Brightness down = KEY_BRIGHTNESSDOWN
Then we have to move the config file we just created so that lirc uses it:
sudo cp ~/lircd.conf /etc/lirc/lircd.conf
Now we can start the lirc service.
sudo /etc/init.d/lircd start
Test the IR sender works with
irsend SEND_ONCE lamp KEY_WAKEUP
(I called the remote ‘lamp’ when setting up in irrecord)
Setup of Node.js#
Now the raspberry pi can talk to the lamp, we need the pi to talk to IFTTT. While it’s possible to create apps for the google assistant directly, it seems to be more for big companies than for individuals messing around. IFTTT is pretty much made for our situation. IFTTT has a webhooks service that we’ll be using to tell the pi what to do. We’ll install the latest version of Node.Js with this amazing script by Richard Stanley. It works for the Pi 1 and Pi Zero unlike every other auto installer out there. Node.Js will do everything we need, is easy to install with this script, and doesn’t need much extra setup.
sudo su
wget -O - https://raw.githubusercontent.com/audstanley/NodeJs-Raspberry-Pi/master/Install-Node.sh | bash
typing
node -v
verifies version 9.3 is installed and working Now here is where we can make use of Kyle Peacock’s handy google home starter project.
wget https://github.com/krpeacock/google_home_starter/archive/master.zip
(Because I’m a scrub that avoids git like the plague.)
unzip master.zip
I renamed the folder to something more suitable
mv google_home_starter-master google_lamp
now we’ll set it all up
cd google_lamp
nano .env
add the following
DEV=FALSE
PORT=80
PASS=yourpassword
now to install the needed modules, make sure you’re currently in the google_lamp folder when you run this command:
npm install python-shell express body-parser dotenv
Now this is where I deviate from how Kyle has done it, rather than having a long list of different python scripts and database of switches, we’ll create one python script and simply pass on the command as a python launch argument. We will send the command from IFTTT as part of the POST web request. The javascript will run a python script with the command as a launch argument. Finally the python script will run a bash command with the argument in place of the IR command to be transmitted. It’s not exactly streamlined but IFTTT doesn’t have a “run bash script on your raspberry pi” service yet. so we create public/python.lamp.py, which looks like:
import sys
import subprocess
import time

#My lamp has four brightness levels, but I only want to switch between
#max and min brightness
#Each button press is one level shift, so we repeat the command four times
#irsend probably has a built-in way to send commands multiple times but
#I'm too lazy to google that
if (sys.argv[1] == "KEY_BRIGHTNESSUP" or sys.argv[1] == "KEY_BRIGHTNESSDOWN"):
	for x in range(4):
		rtn = subprocess.call(["irsend", "SEND_ONCE", "lamp", sys.argv[1]])
		time.sleep(1)
else:
	#Otherwise we can just pass through the command and send once
	rtn = subprocess.call(["irsend", "SEND_ONCE", "lamp", sys.argv[1]])
I replaced app.js with a simplified, butchered version:
require('dotenv').config();

const PythonShell = require('python-shell');
const express = require('express');
const bodyParser= require('body-parser');
const app = express();

//Server Configuration
app.use(bodyParser.urlencoded({ extended: true }))
app.use(express.static(__dirname + '/public'));

// If you have a frontend, drop it in the Public folder with an entry point of index.html
app.get('/', function(req, res){
    res.sendFile('index');
})

app.post('/api/lamp/:id', function(req, res){
    // For now, uses a simple password query in the url string.
    if (req.query.password === process.env.PASS){
        var scriptoptions ={
            scriptPath: './public/python',
            args: [req.query.command]
        };
        PythonShell.run('lamp.py', scriptoptions, function (err) {
            if (!process.env.DEV){
                if (err) throw err;
            }
        });
    console.log("Running Script with arg: "+req.query.command);
    res.send("OK")
    }
    else {
    console.log("invalid password")
    res.send("Error")
    }
})

app.listen(process.env.PORT, function(){
    console.log('Listening on port ' + process.env.PORT);
})
and run the server with
sudo npm start
I used the app Postman on my windows machine to send some test POST requests. The request took the form of: http://raspberrypiIPAddress/API/lamp/lamp?password=yourpassword&command=KEY_WAKEUP Then Set up port forwarding on your router for the raspberry Pi’s address and port 80. My router handily also has an inbuilt DDNS service, so now the POST requests can reliably be sent by anyone on the web. Some might say this is insecure, I would argue having a hacker take control of my lamp would be hilarious.
Set up IFTTT#
Now all that’s left is to make some custom applets on IFTTT. It’s fairly straightforward though a bit tedious creating each applet for each command; off, on, red, blue, green, white, brightness up, brightness down. Click create applet to get started. For each ‘if’ select the Google Assistant service. You’ll need to login to your google account, since this commands will only work for your devices. Enter what phrases you want to have trigger the action and a response. Leaving the response blank defaults to ‘OK, performing action’ so even just entering ‘OK’ is better than nothing. Then select the webhooks service for the ‘then that’ half. Enter in the URL for that action, eg http://raspberrypiIPAddressordomain/API/lamp/lamp?password=yourpassword&command=KEY_SLEEP remembering to change the command to the correct lirc command for each action. Also be sure to change it from a GET to a POST request.
All Finished#
Now your lamp will respond to your voice. I hope you’re happy with how much time you just spent to save the tiny bit of effort to turn of the light at night. Ideally you’ll solder the components together and place the raspberry pi in a proper box but instead I just taped it to the back of the table.
Comment
- Username, 2026-01-27