Pi Unbound

Pi-hole running on my little Pi 3 has been great, I use it to:
- Block ads
- Add names for my internal network services
- Bypass my country’s internet censorship
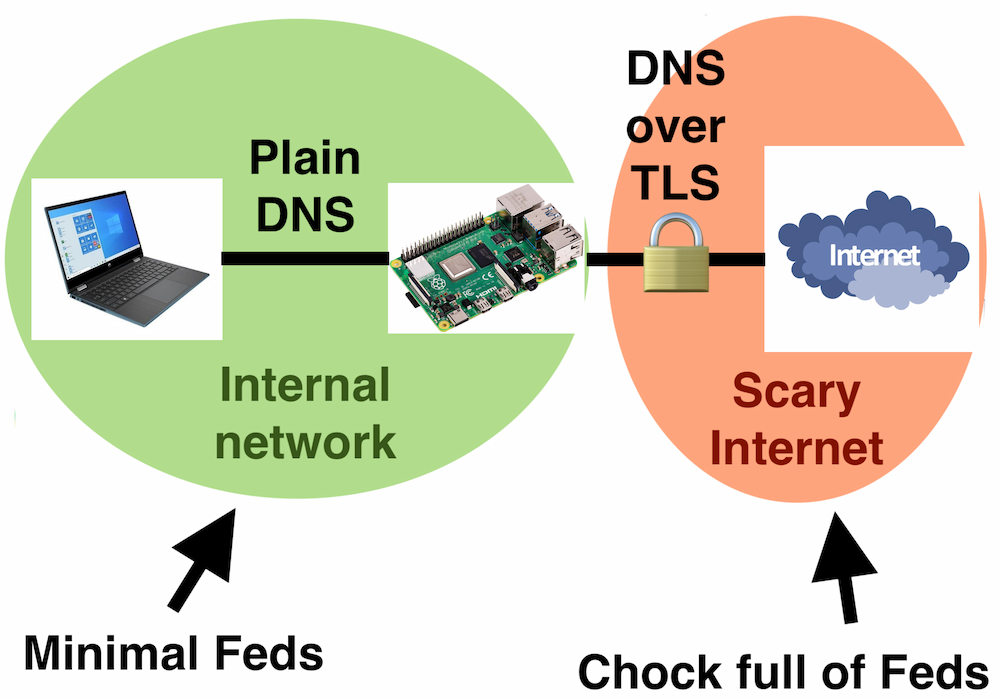
But I want more, I want encrypted DNS. HTTP over TLS does a lot to keep your data private, but there are leaks that give away what websites you are visiting. When connecting, your computer’s DNS politely tells your ISP every domain for every website you visit. I was already using a third party DNS server, but since DNS is unencrypted, it can still be monitored. While my ISP/Government would need to go the extra mile to sniff the DNS traffic rather than just log requests on their own DNS server, we’re talking about something off the shelf software can do.
To combat this you can use an encrypted DNS protocol when reaching out over the internet. There are a a surprising number of protocols that offer encryption of DNS traffic. The most popular in common use today are DNS over TLS (DoT), and DNS over HTTPS (DoH). Insert picture of Homer going ‘DOH’. I tried adding DoT to pihole by proxing through with cloudflared, to give the following setup:
Unfortunately it was a bit flakey. The cloudflared service would need a restart sometimes and setting up a conga line of DNS proxies was fiddly work. Plus there’s a new wrinkle, Encrypted Client Hello (ECH).

When you connect to a server over TLS, the initial unencrypted handshake almost always includes a Server Name Indication (SNI). This is because most web servers are actually massive proxies hosting many different websites. The SNI lets the proxy know what website you are looking for. It’s a bit more difficult to facilitate censorship and surveillance with SNI than DNS, but all of the classic evil countries have been doing it for a while; China, Russia, and … South Korea 🤔. Internet People tried to fix this with Encrypted SNI (ESNI), but then just decided to encrypt the entire Client Hello packet (ECH).
Doing this doesn’t make much sense if you don’t have encrypted DNS too, so the two have become intertwined in the browsers. Chrome for a while would just ignore your network’s or computer’s DNS settings, and just talk to Google’s 8.8.8.8 over HTTPS. A classic Google move of ‘improving security’ that also happens to feed their own tracking and surveillance systems. Firefox will attempt to use Cloudflare’s DoH, but fallback to your OS’s config if it can’t find the domain you requested. (Since it’s likely an internal domain only on your internal DNS server.)
If either can’t connect to DoH, they won’t bother with ECH. In most situations this makes sense, not only would you leak the domain you’re connecting to via plaintext DNS but the extra info needed to pre-emptively encrypt the Client Hello is collected with DNS via HTTPS Resource Records. It’s annoying for people like me that has encrypted DNS over the internet, but clients have no way of knowing that. I’d expect Chrome to be obtuse, but it’s disappointing to see Firefox fail to provide any options or overrides for ECH behaviour.
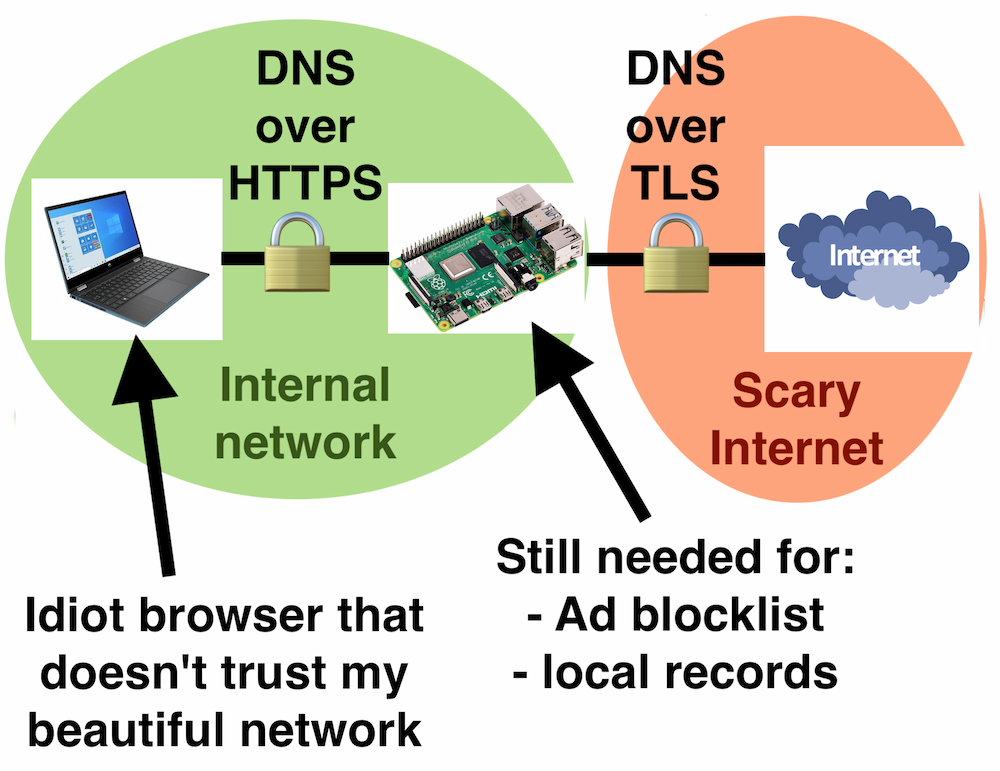
So I need something that can do encrypted DNS at both ends, while also blocking ads and serving my internal DNS records. Like so:
Enter Unbound#
This puppy looks good, supports DoT, DoH, blocklists, custom records. Some people set up unbound alongside Pi-hole, but unbound alone seems to do everything I need, so let’s give it a go.
Enter FreeBSD#
Since this is an experiment, I wanted to install a fresh system on a new SD card. Out of boredom I decided to try a build of FreeBSD 14.1 for the Pi. Let’s also give that a go.
The Guide#
Instead of a UI, unbound uses configuration files like nginx. Except unlike nginx there isn’t a wealth of online examples for every use case, so I needed a bit of tinkering to work out what I wanted.
Ad Blocklist#
I found instructions on Alpine Linux’s wiki for some reason. Unbound has a build in way to list domains that should be blocked, but it needs to be in its configuration file format. You can use this script to convert from a hosts file blocklist to a config file:
#!/bin/sh

echo "server:" > /usr/local/etc/unbound/blacklist.conf
curl -s https://raw.githubusercontent.com/StevenBlack/hosts/master/hosts | grep ^0.0.0.0 - | sed 's/ #.*$//;s/^0.0.0.0 \(.*\)/local-zone: "\1" refuse/'  >> /usr/local/etc/unbound/blacklist.conf
Chuck a include-toplevel: "/usr/local/etc/unbound/blacklist.conf" in the main /usr/local/etc/unbound/unbound.conf so that the blacklist is part of the config.
Upstream DNS servers#
Your pi needs to get DNS records from somewhere. Some cautious people only get records from the root DNS servers directly. I just ask Cloudflare because it is way faster. They say they don’t log or track individuals and their requests, but then also admit that it does happen when their network security logs some traffic. It makes me trust them more when they admit faults like that.
To connect to Cloudlfare over TLS, we need a pile of certificate authorities to trust. We can use Mozilla’s by installing:
# pkg install ca_root_nss
Then point to the bundle in our unbound.conf:
tls-cert-bundle: "/usr/local/share/certs/ca-root-nss.crt"
We’ll need to specify cloudflare’s servers IP, port, hostname, and to use TLS:
forward-zone:
	 name: "."
	 forward-tls-upstream: yes
	 forward-addr: 1.0.0.1@853#one.one.one.one
	 forward-addr: 1.1.1.1@853#one.one.one.one
	 forward-addr: 2606:4700:4700::1111@853#one.one.one.one
	 forward-addr: 2606:4700:4700::1001@853#one.one.one.one
Local DNS entries#
For my devices on my local network, I just hijack the .home TLD. Chuck the records in the conf file like so:
local-data: "remote.home A 192.168.1.211"
local-data: "solar.home A 192.168.1.240"
Set up local DoH Server#
This is the biggest pain. To be a DoH server, unbound needs to be a proper HTTPS server. Until now I haven’t bothered with TLS for my internal web services, but this finally got me to set up a Let’s Encrypt wildcard cert. You need:
- A real public domain
- A domain register provider with a certbot plugin
In my case I’ve got a real domain myhouse.com1 registered on Cloudflare. With a cert for *.myhouse.com, I can hand it to any service and it’ll be trusted by everything. I think I’ll use dns.myhouse.com.
Gonna install certbot and the Cloudflare plugin to set things up for me.
# pkg install security/py-certbot security/py-certbot-dns-cloudflare
Then we need to create an API token to edit DNS records and chuck it into a .ini file for certbot to read.
// Inside cloudflaretoken.ini:
dns_cloudflare_api_token = 93lsakllyxmnvjg8pdf893r098s
It will create whatever DNS records the domains needs to answer Let’s Encrypt challenge, proving that you do indeed own that domain. It will even delete them afterwards for you. 🥰
certbot certonly --dns-cloudflare --dns-cloudflare-credentials /home/freebsd/cloudflaretoken.ini -d \*.myhouse.com
Hopefully you have your cert and key in /usr/local/etc/letsencrypt/live/myhouse.com/ that will work for any subdomain. Tell unbound to use ’em and to serve DoH on port 443 with:
interface: 0.0.0.0@443
interface: ::0@443
tls-service-key: "/usr/local/etc/letsencrypt/live/myhouse.com/privkey.pem"
tls-service-pem: "/usr/local/etc/letsencrypt/live/myhouse.com/cert.pem"
Now for the most important part, renewals! The certbot package has a script to renew certificates weekly, enable it by adding the following to /etc/periodic.conf
weekly_certbot_enable="YES"
weekly_certbot_post_hook="service unbound restart"
You might need to create the /etc/periodic.conf file. The post hook runs after renewal, unbound doesn’t hotload certs, so we give it a lil restart.
Extra config bits#
I needed to specify some basic settings to get unbound working exactly like I wanted.
# Run as the user unbound.
username: unbound

# Listen on all interfaces for plain DNS on port 53 as well.
interface: 0.0.0.0@53
interface: ::0@53

# Accept connections from anywhere cos I don't care.
access-control: 0.0.0.0/0 allow
access-control: ::/0 allow

# Use all 4 of my raspberry pi's cores.
num-threads: 4
There are a lot more settings for performance tuning, access control and logging. Feel free to go through the man page. Here’s the complete conf file I’m using, with some edits for privacy.
You can test your config is valid with unbound-checkconf, but I found there’s no substitute for running it. You can quickly run unbound in the foreground with loads of output in the shell with unbound -d -vvv.
Once it’s working great, enable the service with sysrc unbound_enable="YES", then start her up with service unbound start.
Client setup#
Currently to use DoH you need to manually specify the complete URL in your browser:
https://dns.myhouse.com/dns-query
Yes there is a bit of chicken and egg problem with specifying a DNS resolver with a domain name. Also only Chrome based browsers and Firefox support it. Webkit devs are all for it but it’s up to Apple to implement in the OS network stack.
You can check if ECH is working by visiting this site https://tls-ech.dev/. There’s also https://one.one.one.one/help/ to debug Cloudflare DNS in particular.
Looking forward#
Recently the Internet People have proposed methods for DNS servers to advertise DoT and DoH features (DDR), and for DHCP to specify DoT and DoH IPs, domains, and ports (DNR). So far only Windows has an implementation. It’s only in the insider preview build, and even then you need to set a registry value to unlock the feature.
One day this kind of local self hosted DoH server might be more popular and just automatically work on all devices. When that day comes I’ll finally receive some traffic on this blog.
Bonus Round: FreeBSD on Pi Micro Review#
I quite liked using FreeBSD on the Pi. Unbound is a supported package that comes with service config, so was easy to install and set up. SSH is enabled by default, no need to edit config in SD card before first boot. You can just login with freebsd/freebsd. The little bsdconfig utility helps you set up everything in a TUI.
It seemed surprising that an OS with a 5GB ISO doesn’t come with basics like vim, curl or python installed. Installing 500MB of packages on the Pi to get going is slow no matter the OS. Though fine for my use case, if you want fancy features like audio, wifi, or support for HATs, better stick with raspbian.
-
My domain is actually different but this works as an example. ↩︎
Comment
- Username, 2026-01-27